Tuesday, 29 April 2014

PhpMyAdmin

phpmyadmin
Screenshot1


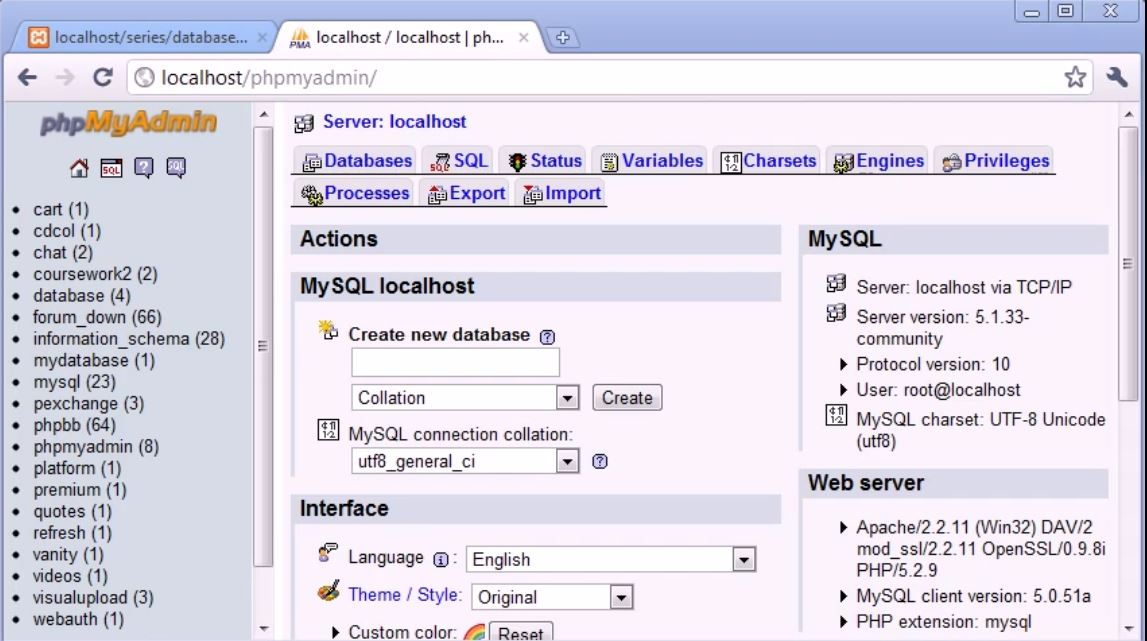
Introduction to database article i had wrote about why we use it databases. Now we need to find easy way manage our database. Before we start it we will connect to our database then we can add and retrieve data. Screenshot1 is the Screenshot of phpmyadmin and its freely available piece of software it does comes with xampp If we go to http://localhost in  You can see it represented with xampp control panel and on that page you can see in left navigation down tools and you can see phpmyadmin so, If you just click on that you can see screen of phpmyadmin like screenshot1. If you don't had xampp you running something else then you can download phpmyadmin copy overview and set you database setting in there so your server in which you working like localhost and then everything will be manage for you.

phpmyadmin Privileges
Screenshot2
First Thing we need to think about is the server. We are connecting to Server so the server name we are connecting to at moment our server name is localhost and this is case format for most mysql host-names for example if i had paid hosting and i was uploading to shared hosting account for example usually i can specify localhost and it will connect straight to that. where ever i can connect to the another database on another server i always had to specify the server name itself.

phpmyadmin users
Screenshot3


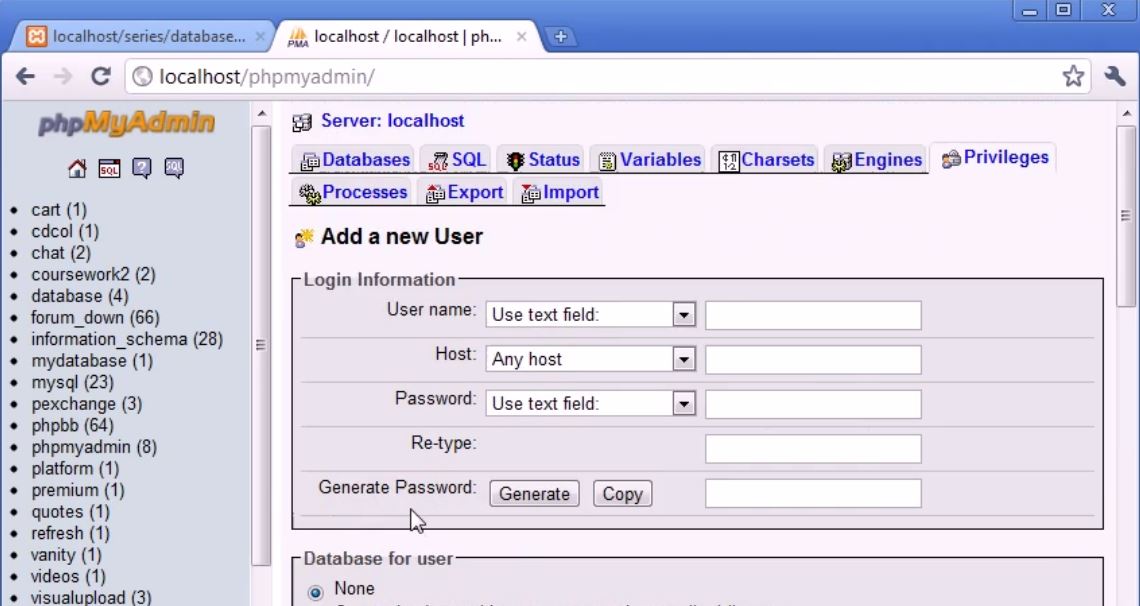
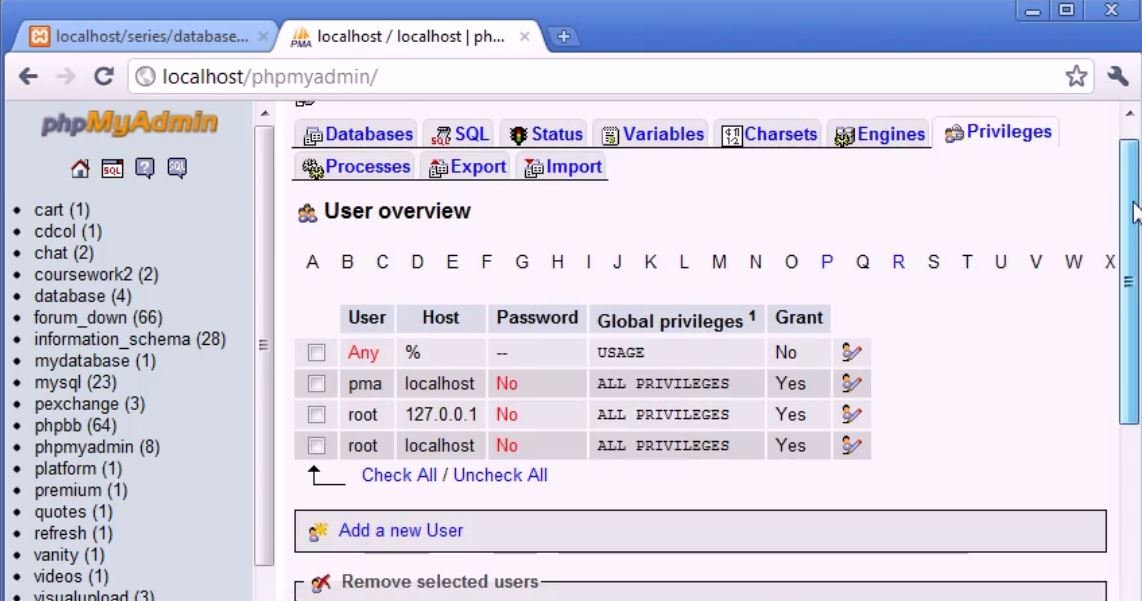
Lets, See the Phpmyadmin -> Privileges (Screenshot2) In Privileges you can see the list of users. In Screenshot2 you can see the user root is twice with host 127.0.0.1 and host localhost and Password no because i am running on my computer i had not connected to the internet then there is no need for me to setup password obviously it will be better to edit the password however for now i had not setup the password so, In example you can see usage i am not going to be using password the password will be blank So, Now we had established the username here is root which can be seen in privileges and you can also add new user. So, if you want to add the users (Screenshot3) it is bit more friendly so you can say any username, host better is to keep localhost then password you can also generate password for more security of your password. So, we had done that now obviously we already spoken about password which is blank in this tutorials. So, we had established the server , username and the password.


Server: localhost
username: root
password: NULL

phpmyadmin create new database
Screenshot4

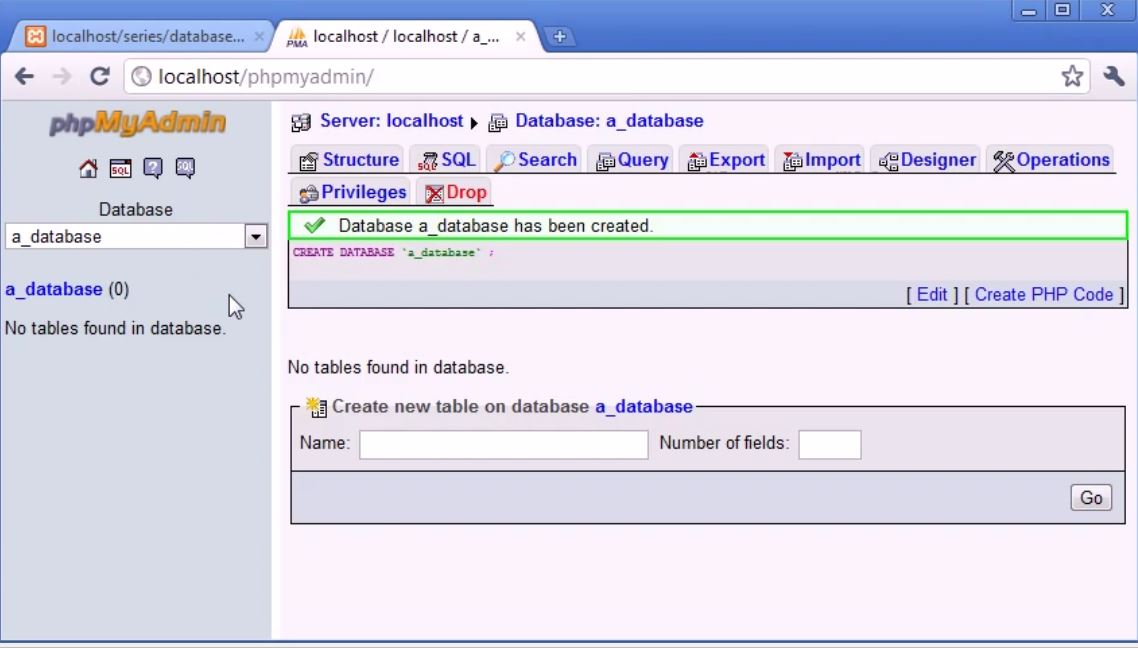
This all we need to use to connect to our database Now we not going looking at that now we are just seen how you can find this information. Now Lets Go to Screenshot1. left side you can see the databases that i had created Years and months ago just think i have worked in general So, You can see database name for example cart, quotes, Videos, this are databases name and to create a new database we you create new database in Screenshot1. So, i can create new database just called a_database and will click create now you can see screenshot4 a_database had created and you can see in screenshot4.
phpmyadmin database
Screenshot5
phpmyadmin tables
Screenshot6
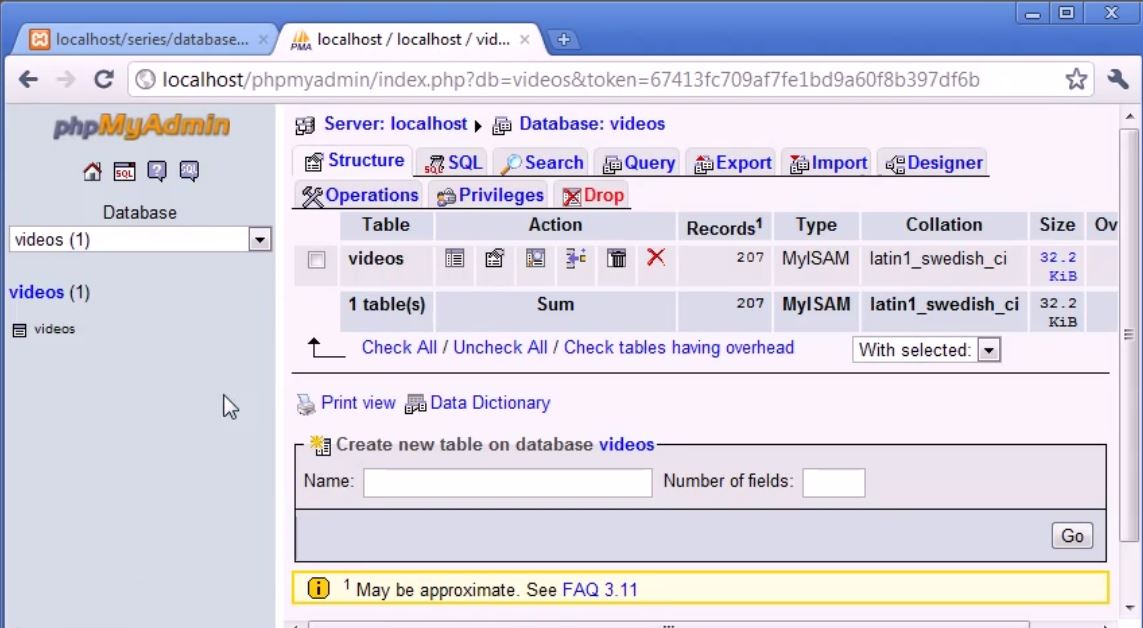
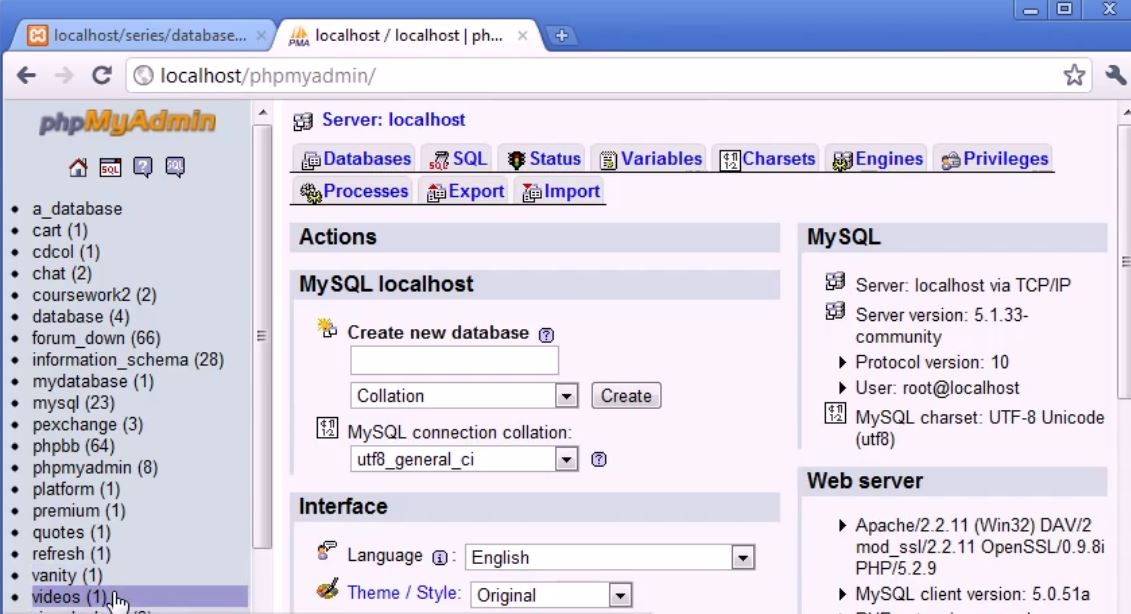
Now In Screenshot5 You can see at home page a_database had listed on left navigation. Now you notice a_database and other database had contain the number in brackets because cart(1), cdcol(1) this numbers are the table inserted to the database in Videos(1) so there will be one table exist on the database called videos you can see in Screenshot6. In database videos it contain 1 table videos. So, in brackets it contain 1. So In a_database there are no table so there is no bracket besides its and when u click on a_database you can see the left navigation contain a_database listed with brackets zero because no table exist we also get message saying No tables found in database. Now Its Fair to have database and inside this we need to store tables we can't directly store data inside into the database it has to contain tables.

insert data into tables phpmyadmin
Screenshot7
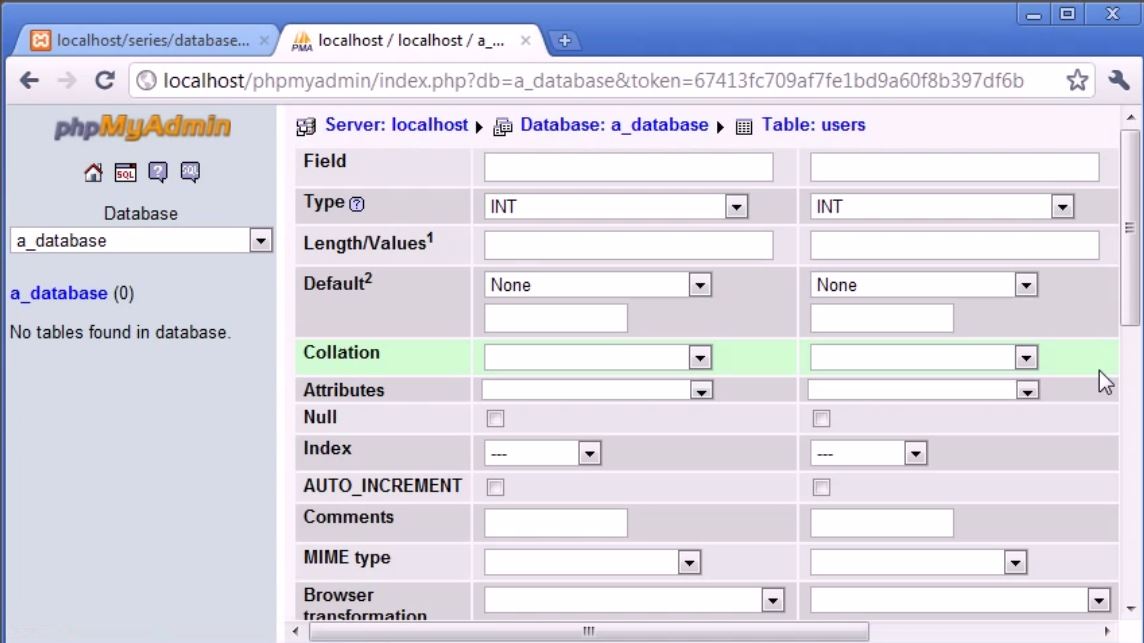
Introduction to database article i had shown you user's table and upload table. So, I am going ahead and create table called user's. Now number of fields is the number of columns which we had in listed in table. Before we create a table think about how many columns or fields like we may need. For Example i am creating a user login databases. the minimum we need id because we need to assign a unique id to be a user , username field, and password field that's only we need to create user login session's. So, Here number of field's in table user's we need 3 field's now i click go Screenshot4. Now what's its going to do its going to transform to this screenshot7. Where i can create each field's inside table. Its look's like lot's of information but you don't had to specify all this box's in Screenshot7. But there are some important part you will need to specify.

For field is the field name So, First one i am going to choose id, username, and last one is password, So, i had specified my field name inside the table. Now i need to specify the type of the data i want to store.  Now storing different type of  data is always like storing the variable with different type of data and You can see we have very extensive list of data like Int reference Integer we will discuss lot different types of data in later article.  Now id remember is the number which will auto-increment will give each row unique value and You can see how it will works in the moment. Now id i will choose type int because it is integer. You can also define TINYINT, SMALLINT, MEDIUMINT, INT, BIGINT, are all types of data which are numeric. SO, i am going to choose INT for this You can also choose something like SMALLINT, Medium Int, However if you expect 100 users on your website This is fine however you are taking to Billions of users then you need to stick with INT data types. So Length/values we don't need to worry about it. Now 2 fields we need to focous in id fields are index and Auto_Increment fields.

Now Remember I said the primary key is the field or column the unique column to specify the unique column. This is the unique number column. So, Index field we assign primary key to id field. And we tick to AUTO_INCREMENT and this allows us to every-time we create a record we are increment this value. So, it will start 0 will be default. Then you create record you have value 1 then 2 then 3 and so on.

Now Let's Come to Username and Password Now obviously we don't want to save the username and password in INT data types. We will assign the VARCHAR. Now VARCHAR stands for variable character. So, what we can do here is we must specify the length/values field So, username say no more then 30 character. So, we can specify this is 30. Password will be adjust the same it may be less then 30 Characters. But this is something you going to have specify in your program. Let say you have to create user login system. You have to say you know give max length to text field. And check inside php if the password specified the username specified Word not more then 30 because anything bigger then 30 attempting to be written into this table it will be cut off.

Default values is the values if the user does not inputted and it may be saved default if the field is leaved blank it will saved by default value. If we create stayloggedin column and this may be equal to 1 or 0 depending on  the user logged in. But by default it will be zero. If this make sense. Now we can come down and click on save.
phpmyadmin users table
Screenshot8
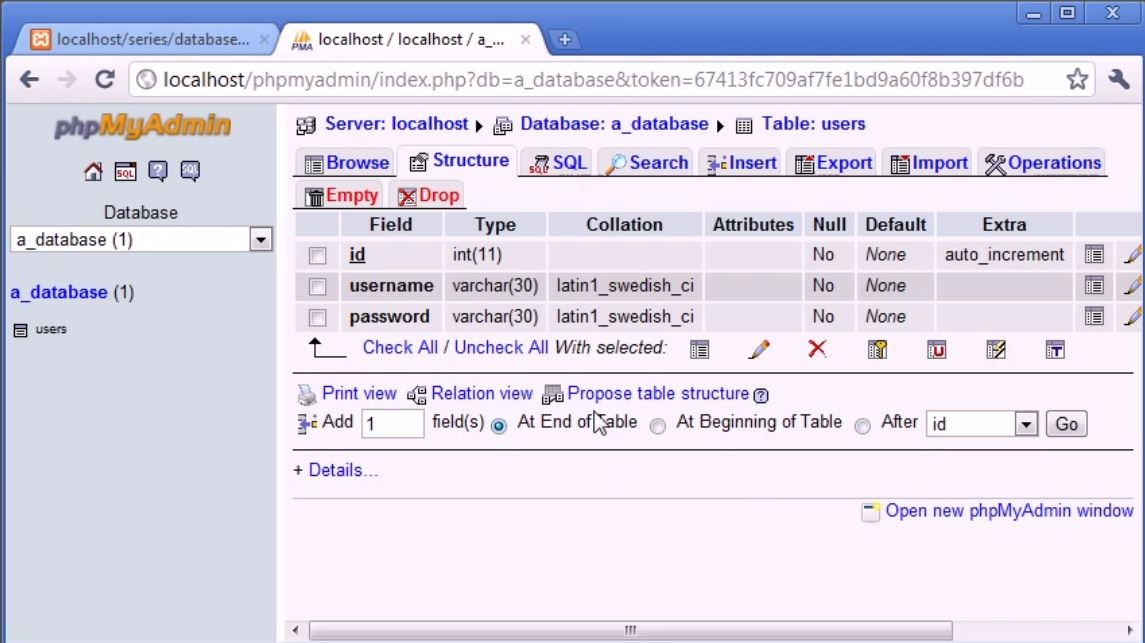
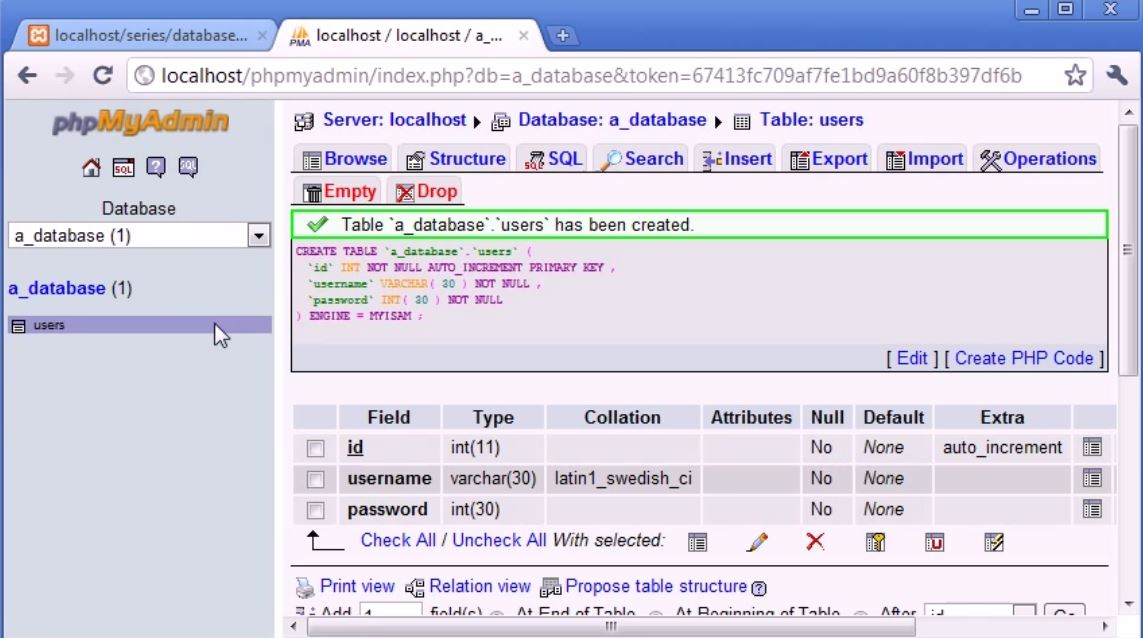
Now You can see in screenshot8. that we had created a table called users. And we got number 1 with a_database. which shows there is one table inside the a_database. So, You can see we got the information. You can see id underline which means its the primary key. And we got our type so you can see int is a length of 11. So, we can specify 11 digits of length in INT type. Its may be consider to much like i said if you got millions of users. You got VARCHAR 30. and password VARCHAR with 30 character. You can also see extra is defined auto_increment.

phpmyadmin username
Screenshot9

phpmyadmin password
Screenshot10

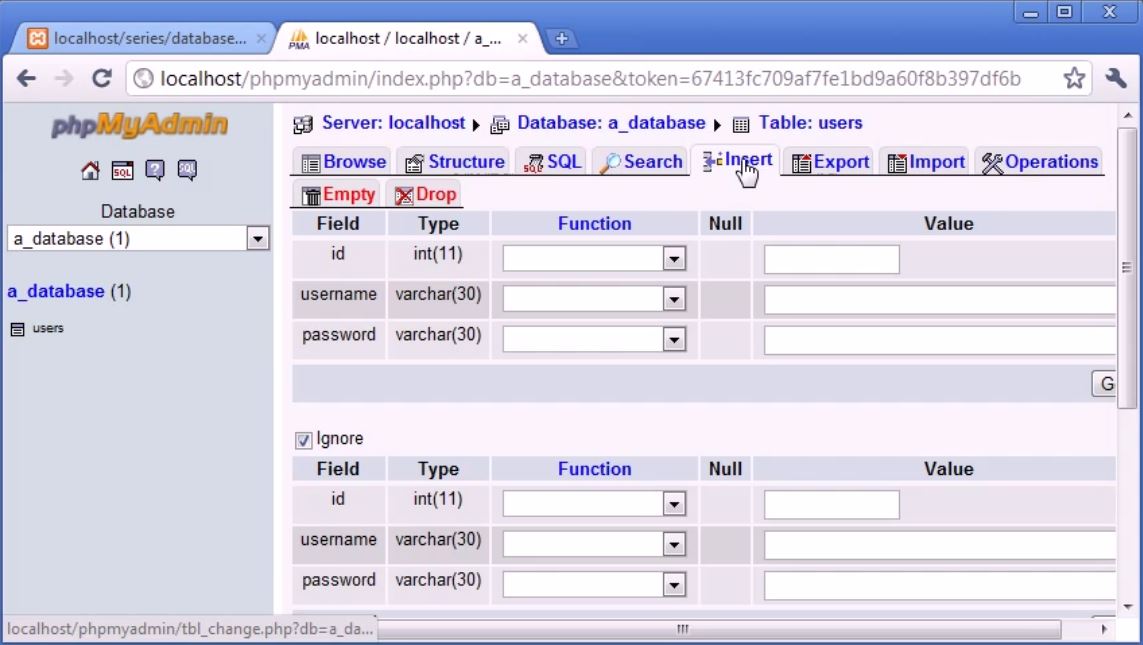
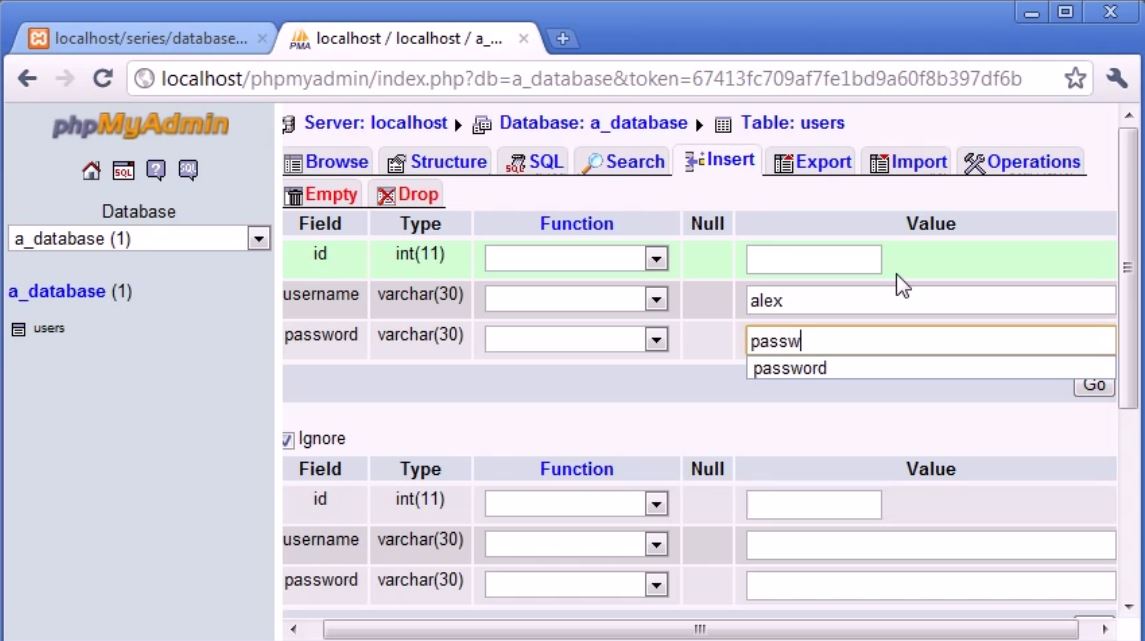
Now let see how to insert the data into this table because at the moment we got the table. But we don't got the data. Now this data you are going to inserting from the php. The form will check inside the php script of the username and password. However we can do manually from phpmyadmin if we wish to do so. So,i am going to click on insert Screenshot9. And id we can leave blank because remember its auto increment fields. We can specify left blank and it will automatically update. Now You can see the Screenshot10. We can also specify the rows of insertion we can also specify 40 rows for insertion for example. But Now I will Just Insert alex and Password and will click to go.
insert query phpmyadmin
Screenshot11
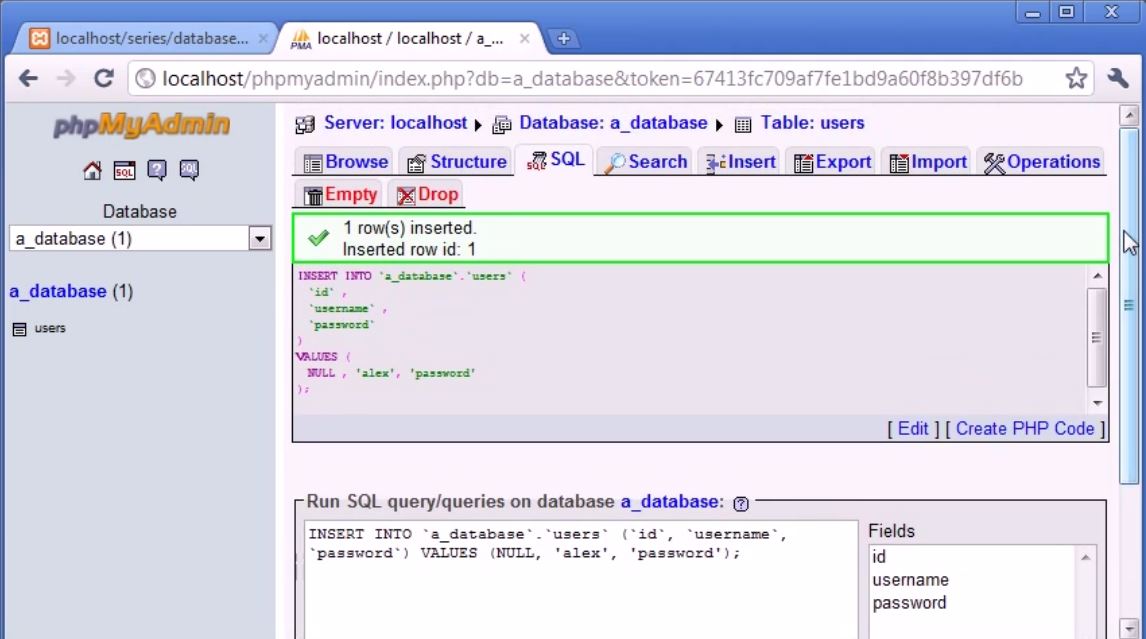
Now You can see screenshot11 we have few things return here in Screenshot11. Firstly we see the conformation. We can see 1 row inserted which we have inserted. Inserted row id: 1 which is our auto-increment field. Now You can See In Screenshot11 the query had constructed for insertion of the data.


 INSERT INTO 'a_database'.'users' {
'id',
'username',
'password'
}
VALUES {
NULL, 'alex','password'
};

Earlier i had told you about query How they can insert data Here we got insert into a_database which is the name of database dot users which is table we are accessing a_database table which is users. id, username, password and then with the value Null, for id we are not specifying value for the field because its auto-incremental. alex for the username, and password field value is password. So, Null corresponds to id, alex corresponds to username, and password corresponds to password.
phpmyadmin tables
Screenshot12
phpmyadmin datatypes
Screenshot13

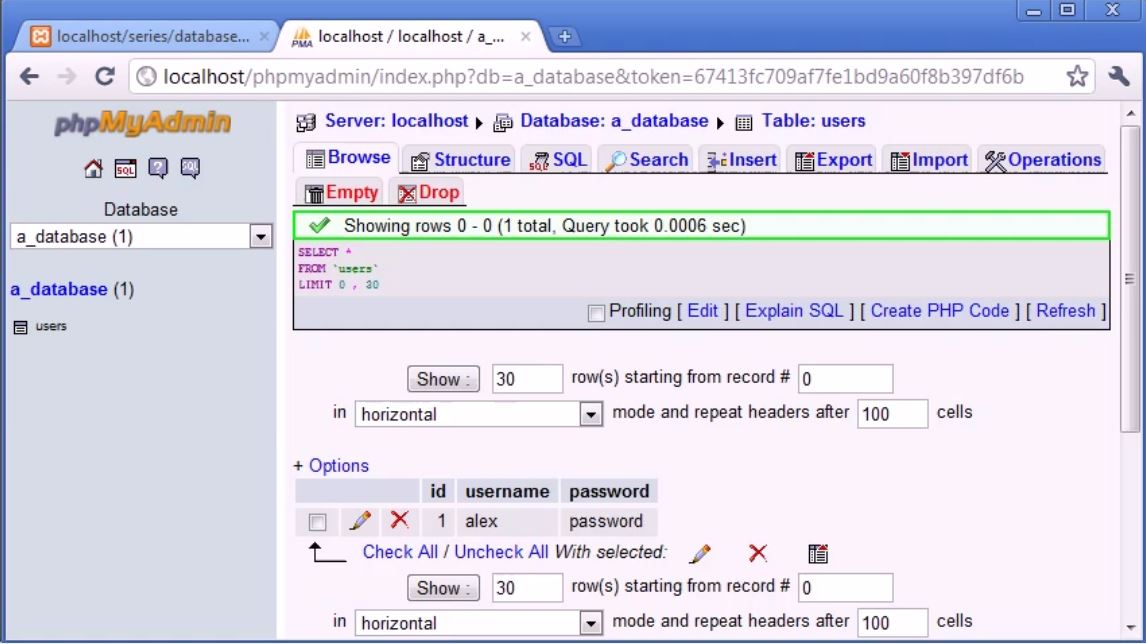
Screenshot12 you can see the representation of the data in our database. So let's insert another let's called this time billy  and password pass123. Now we had inserted another row with id 2 remember that's auto increment. We perform query but with different values. You can see in browse tab. Now we are adding another Columns say first name and last name. So, Let see how we can do this. In Structure tab You can see at down add certain amount of fields at the end of the table , at beginning of table and after specified fields in our table. So, in my case i will insert fields at the end of the table. You can see in screenshot13 I will add 2 fields. Then same as earlier i will specify the field , type , length/ values Like firstname, lastname in fields, VARCHAR in type and length values are 40.
alter table phpmyadmin
Screenshot14


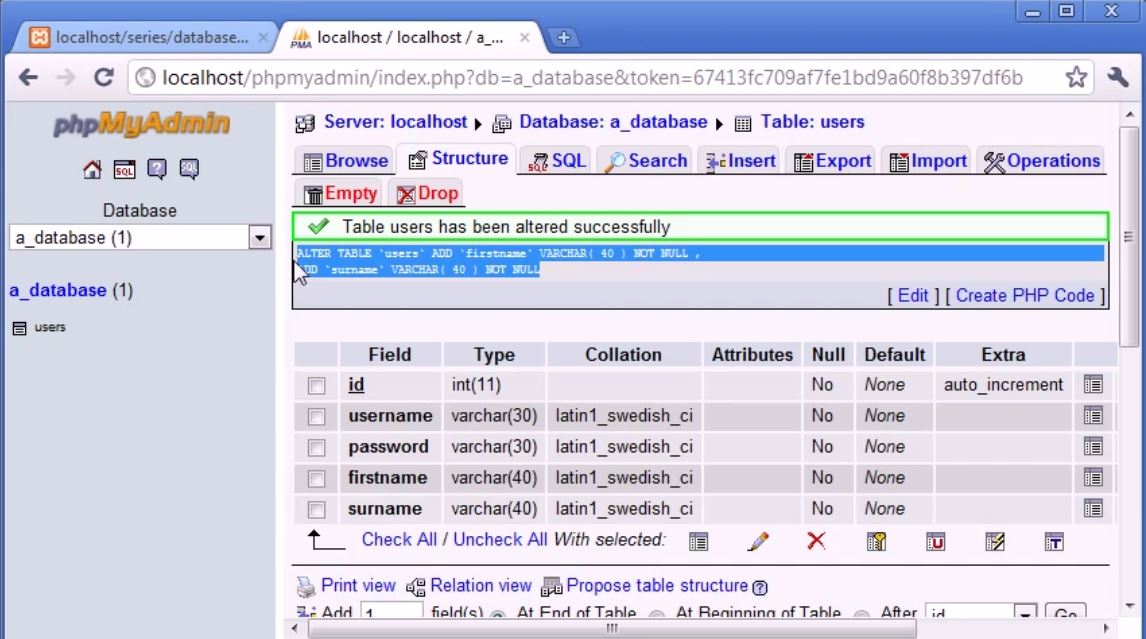
ALTER TABLE 'users' ADD 'firstname' VARCHAR (40) NOT NULL, ADD 'surname' VARCHAR (40) NOT NULL 

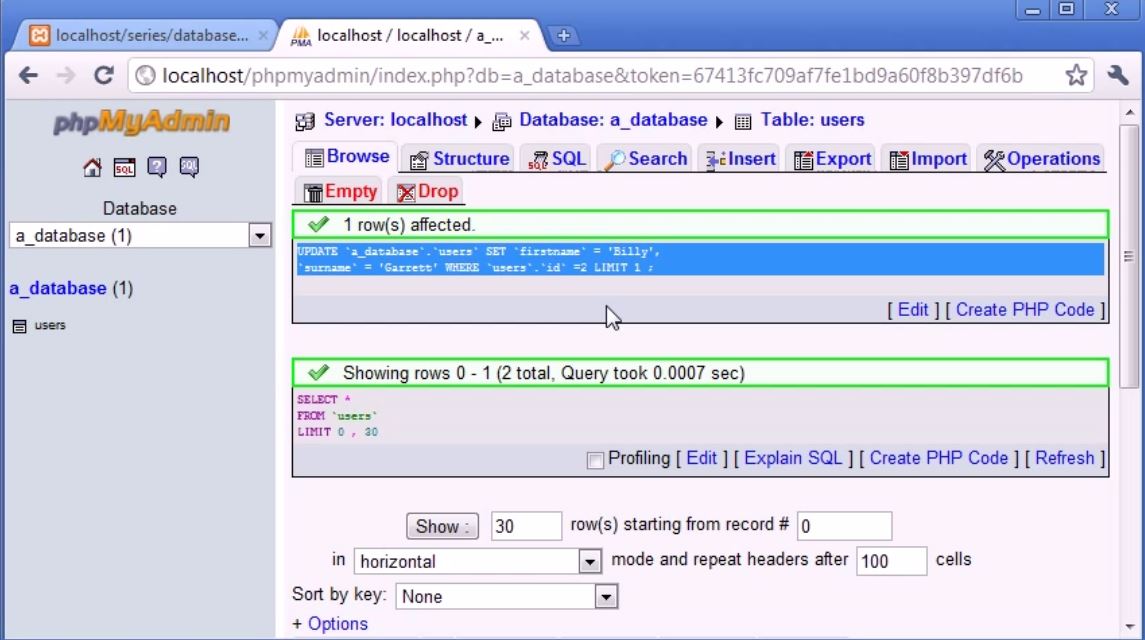
Here we are altering the users table with tow more fields firstname with varchar character 40 and not null it means it should contain some data. Surname varchar length 40 not null. So, this is our query to alter the table and add two fields at the end of the table. Now In Browse tab you can see the no data has been inserted to those fields so i will insert the data of the two existing fields in the table. For Updating the table in existing fields. It will Give us the query Screenshot15. So, every-time we perform query in phpmyadmin it usefully gives us the query back so  if your structure is clean to understand the concept of the queries and how to structure them and what they do and how they work Later on then its really good thing to do just play around like insert things, delete things, change things, and just note of the query.
update query phpmyadmin
Screenshot15
In this case what we will do we had updated the particular fields in Screenshot15. In this case we updated the billy garrett we had updated which id is 2 So our query is update database name a_database, table name users and we set fields name firstname equals billy and surname equals garrett where table name users id fields name value is 2. It will update the data of fields id where value is 2 it will insert the data into the fields of firstname and the lastname.

phpmyadmin database
Screenshot16
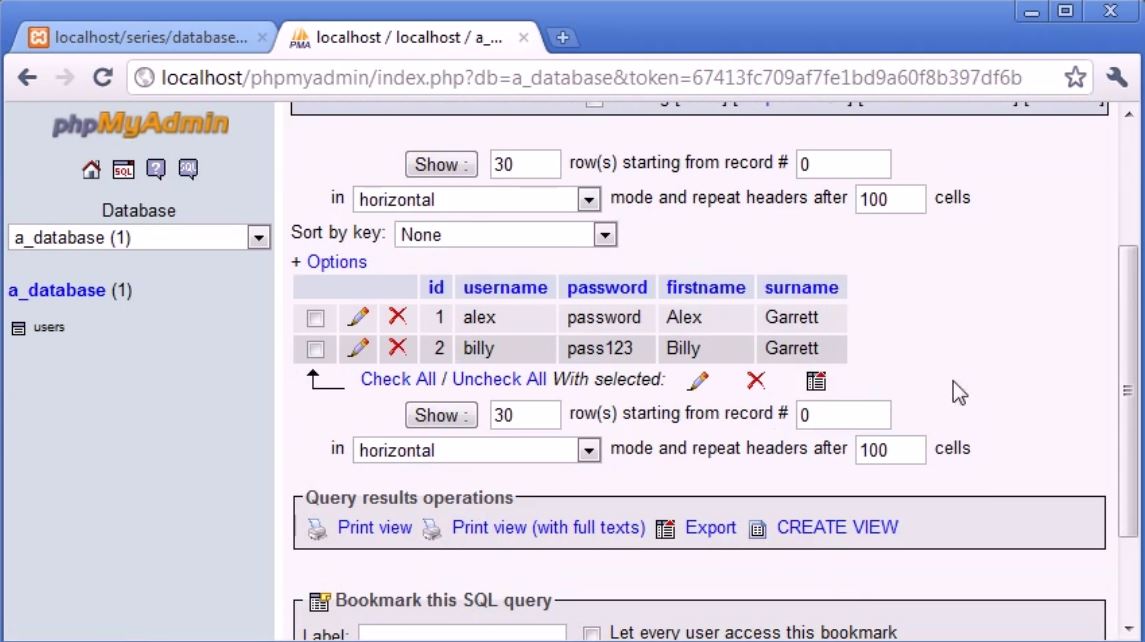
You can see in screenshot16 our data has been updated successfully we had alter the fields and then update the fields. You can perform variety of operations inside phpmyadmin. Its extremely powerful tool. So, may be before you start using queries and thing like that inside php. Have a play around here and just understand how may sql is structured and its datatype. How to do things works. Then go over to the php scripting side of things. So, for now its just the quick instruction about phpmyadmin how to use it in ways we are talking about of tutorials there is also lot more functionality behind it. Its just brief introduction about phpmyadmin.

Read More

Friday, 25 April 2014

An Introduction to database

An Introduction to database
We are going to talking about databases. Now in this article. I am not going to teach you how to setup the database or how to write in database etc. But we just going to be talk about why database important in most real life applications. I am also going to talking about mysql database. Why we need to use the database now you may come across the database before access another database applications so where you can store values with pacific column name so, you can store this values as a array also. you can also do this with Microsoft excel. If you already seen file handling in php. You know we had store things hit counter value in a file and then we had open the file we read the value in and close the file we may then open the value of the file applicant to rewrite another value. This uses huge amount of strength and complication in as well on whole process. Now let say we want to write a value to a file what we doing is we were opening up that file so, reading file data we are then writing a value to a file. What happen if we want to say to include username , password , firstname, surname , website you may have written 100s of records with people username the password. You may want to create some type of login system for this. Now you not going to do file to store this data. You will use database to store which is more secure and quickly accessible. In this case we will use mysql database connection because its one of the fastest database available to you.

Mysql Database
Screenshot1


Mysql database is hosted on to the server. So, it will have its own port number If you open xampp control panel application Screenshot1. You will see we had process running mysql and its running at this moment. From php you don't need to worry about accessing mysql database on to the server. But we do use some functions to connect our database. then we shall connect to our server. Then we use another functions connect to the databases itself. So, you can have variety of amount of databases within mysql. Then you had variety of table inside databases. Now database let say user's Example of user's database.


Example of user's database


database: tutorialsjackpot
--------------------------
table: Users
------------

id    username   password  firstname  surname  website
1     hello          hello123  hello          tell         hello.com
2     How        how456    how's  you         how.com

Here we had database structure in mysql database in users is the table name. Our database name is tutorialsjackpot and the table name is users. Now the way we can access this is we can select our table. Now we are storing the users into and then selecting different value's. So, i can execute something called query which will select specific amount of data from specific row. You also had field called id which is auto-incremental its increment every time. So, each record created. Its automatically increments and this add  unique property and we can define primary key for this id. Primary key is the unique figure unique column in your database.

Now let say i want to select some data so we can say select the username from 'users' where the id is equal to 2. Here users is the table name and this is what we can called query. Its just an English language. But what i had done here is construct general idea something called query about. query does allow us specific syntax to select information from parts. So, what we are doing here is we are selecting the username in column of username from users table where id is equal to 2 means it will give use how. So, this query return the value hello So you can see advance storing inside the database it may look complicated. At this state but when you start using inside php. Php makes it very easy for you to extract data even insert data and perform idea of queries. This done from mysql database. you can also have other tables.


Table: uploads
---------------

id     user_id      location
1      1               logo.jpg
2      1          php.jpg
3      2          art.jpg

we had table say uploads we may allow users to upload files. Now why it is going to be useful. Just add another columns called id, user_id and location. So, the id will again will be auto-increment. But this time user_id What we are doing here is we referencing user_id into the table of users columns id because that is the users id so you can called this columns name anything you like. But i recommended similar structure. So, User id met be 1 and the location of the file which been uploaded. may be logo.jpg and another file is also uploaded by same user so user_id while be 1 and name of the file may be php.jpg. and another file is uploaded by second user hello which user id is 2 so user_id referencing is 2 location art.jpg. So, now what we can do is we can perform the query to say let say user is logged in hello. What we would do we have its id to select things relative hello the id is 1 this is unique to the user hello. So we can say select column name from table name where column name is field value

Example

select location from 'uploads' where user_id is 1


Now What this query here will do it returns values where ever the user_id equals 1. SO, What essentially return.


Output of the query

1      1            logo.jpg

2      1       php.jpg

Now we had selected locations only So, what it will do is it will only print back logo.jpg , php.jpg data. So, what we can do is to speck this out we can select a specific column name So, we can save our time in a program our load time and we can save resources. So, Its essentially for using  database the reason we use its quick and easy way to add information's, that can be easily retrieve we don't have to deal with text files. we don't had to deal with space between file, or commas between characters, hello,bye,goodmorning, So, retrieve from the file we need to open file. we need to use explode function in php to read all this comma's,and to put this into a array. But in database you are creating something you can visualize how extract specific data. You can also update data very very easily with just a single query. So, that was the introduction to databases. Like i said we are going to be using database MySQL and SQL stands for structured query languages. Now was talking about queries. SQL stands for queries. we had structured query which to retrieve, update, delete, create anything inside our table. MYSQL is the name of the databases. we are going to be using.


Read More

Tuesday, 22 April 2014

Reading xml File in php

xml
In article Introduction to xml in php you had notice i had already return the structure for my example for xml file example.xml file Screenshot1. In this article we are going to reading in different element of this data So, You can see in Screenshot1 we have producers tag is root tag which is important its must exits in every xml file its called root tag of xml file you create. Producers tag is the tag name you can create you own name tag. Our producers are root tag which are open and close at the end of the xml file. <producers> </producers> and inside here we get tag here called producer and we are ending it by </producer>. Inside producers tags we had 3 producer which contains we had elements name, and age for each producer tag. So, What we can do inside php once we open this xml file successfully we can say grape elements of first producer name or vice versa we can grape elements of second and third producer. Now inside our index.php file we are going to loading this xml file inside php file and access as in array we are loading this in as an array or rather each element in each producer to it. We can access in (->) Symbol here to each elements like producer , name etc. We can had many parents and children in xml file. we can access them by array.

example of xml file
Example of XML FILE exmaple.xml Screenshot1

Code for XML File (Screenshot1)


<producers>

<producer>

<name>alex</name>

<age>21</age>

</producer>

<producer>

<name>Billy</name>

<age>16</age>

</producer>

<producer>

<name>Dale</name>

<age>49</age>

</producer>

</producers>

Code For Reading xml file in php (Screenshot2)

reading xml file in php
Reading XML File In PHP Screenshot2

<?php


$xml = simplexml_load_file('example.xml');


echo $xml->producer(1)->name.' is '.$xml->producer(1)->age;


?>


Output Screenshot3

xml file readed by php
Screenshot3 Output
Now Lets See example firstly we are opening our xml file creating new variable called $xml and i am going to be using this function called simplexml_load_file. Now simplexml_load_file is a new feature introduce in php5 that allows open a xml file using simplexml_load_file function and really easily access each element of xml file. Inside simplexml_load_file function we will specify example.xml So, now we successfully open up our xml file. Now we will returning some values. We don't need to include producers tag anywhere because its just a root tag about document its not important. But we can do is each producer tags and elements inside. we will echo $xml-> now we going to say producer which is the name on xml file producer tag. In xml everything is case sensitive So if suppose producer is Producer you had to use $xml-> Producer but now we are going to use producer tag only. In square brackets because we are going to choose which producer we want to echo data for. So here we are doing with array so, producer[0] is alex , producer[1] is billy, and producer[2] is Dale. So, Just for example I am going to echo out 1. So, it will give me element billy then now we want to access tag we want to display. So, i want to display name , age of producer[1] which is billy. So, $xml -> producer[1]-> name will display the name of the billy and $xml -> producer[1] -> age will display age of the billy and we had concatenate with is so its looks good you can see the output in Screenshot3.

So, Now you had a idea why it is useful they can be add in structure format using programming in php. It can also do with other web development languages. So, its very very useful tool.

Code for Reading xml file in php Screenshot4

reading xml file array in php
Reading xml File as array in php Screenshot4


<?php

$xml = simplexml_load_file('example.xml');


foreach ($xml->producer as $producer) {

 echo $producer->name.' is '.$producer->age.'<br>';

} 


?>

Output Screenshot5

xml file
Screenshot5
Example of Loop so we can get names of all producer for this we will use FOREACH STATEMENT IN PHP. In foreach statement we can say foreach ($xml->producer as $producer) We had fetch all producer into variable called $producer So, for each $xml producer we are using $xml to open file of xml file So for each one of this producer we had named as $producer then we are displaying all producer in to the browser.

If you want to users all tweets on twitter you can use in same way as here in xml i had used for graphing data from the xml file. Reading data from xml file. Using foreach statement you can grape all data from the xml file and access them individual. The purpose of showing this tutorials reading to xml file is to show the structure of xml file if we know the structure of the xml file we can grape data from that xml file. We grape every single data from the xml file.  


Now If we had a Child elements inside of our xml documents. In previous example Screenshot1 however what happens if you want to add items further information in about this producer.


Code for XML File

example.xml File


<producers>

<producer>

<name>Alex</name>

<age>21</age>

<show>

<showname>A show</showname>

<showdate>12th December 2010</showdate>

</show>

<show>

<showname>Another Show</showname>

<showdate>4th July 2009</showndate>

</show>

</producer>

<producer>

<name>Billy</name>

<age>16</age>

<show>

<showname>Better Show</showname>

<showdate>25th July 2007</showname>

</show>

</producer>

Code for Reading XML FIle In PHP

index.php


<?php

$xml = simplexml_load_file('example.xml');


foreach ($xml->producer as $producer) {

echo $producer->name.'('.$producer->age.')<br>;

foreach ($producer->show as $show) {

echo $show -> showname.' on '.$show->showdate;


}

 }


?>

Output Screenshot7.

xml file
Screenshot7
Now inside each producer i want to specify a show that they both produce so for example in producer i had create child called show and i am going to end show and now going to provide some details about show tag inside show tag like showname tag and showdate tag. In 1st producer i had created 2 show tag with element inside it called showname and showdate. We also maintain the particular details about our producer. So, if we come to the database like structure we got name and age in producer then we got two different shows that in producer. So, we are not only accessing each producer we also access on the show tag which is inside the producer which is called child of producer tag. And also added one show to billy .In this way we had structure our xml file now let see how we can read this xml file from php script and display parents and child's into the browser.

Now Come to php page we already seen to add xml file in previous example and foreach statement in php. Looping through each producer as a variable producer now what we can do Echo out the producers name by using this structure we had established we can do the line break $producer->name.'<br >';It will give the name tag inside the each producer. Then $producer->name.'('.$producer->age.')<br>'; Now it will give name and age tags of each producer tag. So, we will get alex 21 and Billy 16. Now Echo $producer->show->showname.'<br>'; Will display the Show tag inside showname tag content Screenshot6. Now we will show in the proper manner. By foreach statement in php. foreach producer show tag will retrieve in variable $show foreach ($producer->show as $show) . Now We had taken each element of show we can access on each element of the show tag So, will echo out $show->showname.' on '. $show->showdate will we can had access on element of the show tag which is on our loop You can see the output on screenshot7.By same structure and tags will remain same our data is automatically updated from the xml file. So, this way we can use xml file for reading in php.

xml file
Screenshot6


Read More

Sunday, 13 April 2014

An Introduction to XML in Php

xml language

Its Quick Introduction about xml now some of you may know about xml and some of you may not. But xml becoming part on internet in how we transfer pick up data from different websites and also how we become transfer data from database to another database using custom tags inside xml file. XML stands for extensible markup language and it is a markup language So, its similar to html similarly we use markup tags.


For example in html we define tags like

<html>

</html>

But in xml what we can do we can create our own custom tags that allow us to define data and pickup data using different tags. 

For Example For XML File
xml file
Screenshot1


<producers>

<producer>

<name>alex</name>

<age>21</age>

</producer>

<producer>

<name>Billy</name>

<age>16</age>

</producer>

<producer>

<name>Dale</name>

<age>49</age>

</producer>

</producers> 


We had Producers tag inside we have producer tags inside we had name tags and age tags then we duplicate it 3 times. Now this may all look they may not make sense however what we had done here is we created structure way of displaying our data now if i would to say someone bring 2 and 3rd producer what it will be able to do access this tags. Its access the producers tags first of all then coming through inside we had to say feed this into the array and we can able to select just 2 and 3rd producer means billy and dale with there ages information. to last producer so, its great way to transfer data around the web and in the format recognized depending on what tags its view so you can have access what tags are and which tags are required. So, this xml data we can read through different web applications and software.

Why it is useful in php programming

xml file
Screenshot2

Now You may notice that or may not facebook, twitter, Youtube all have preset xml file for different users so for example lets just bring up an example youtube xml file Screenshot2. Now its Not correctly structured in times to Independence things like that if we go down information's about videos users you get description of video , You can also see media title its just the general information this all can be read by using php now we going to work with creating our own simple xml file and reading and learning how to read them in. Then what we going to do is we will take an example of a data feed from either youtube or another social networking website. That we can access a users feed for example from twitter and things like that. Now its the introduction to xml file you can go to different website and see how they make there xml files and have a carefully look at some may be structured some may be not be like screenshot2.  

Read More

Thursday, 10 April 2014

Creating a Simple Contact Form In php

Contact us form sending email in php
Creating a simple contact Us Form in Php. As you had seen most of website creates the contact form for visitors to contact them so this tutorials we are creating the contact form with sending an email in php. We will Create a Contact Form and will Send Email to Our self that contact form.

Code For Creating a Simple Contact Form In Php


<?php


if (isset($_POST['contact_name']) && isset($_POST['contact_email']) && isset($_POST['contact_text'])) {


$contact_name = $_POST['contact_name'];

$contact_email = $_POST['contact_email'];

$contact_text = $_POST['contact_text'];


if(!empty($contact_name) && !empty($contact_email) && !empty($contact_text)) {


if(strlen($contact_name)>25 || strlen($contact_email)>50 || strlen($contact_text)>1000) {

echo 'sorry, an error occurred. Please try again later.';

}else{

$to = 'roxsmohammed@gmail.com';

$subject = 'Contact Form Submitted.';

$body = $contact_name. "\n".$contact_text;

$headers = 'From: '.$contact_email;


if(@mail($to, $subject, $body, $headers)) {

echo 'Thanks for Contacting Us. We\'ll be in touch soon.';

}else {

echo 'Sorry, an error occurred. Please try again later.';

}

}

}else {

echo 'All Fields are required.';

}

}

?>


<form action="email.php" method="POST">

Name:<br><input type="text" name="contact_name" maxlength="25"><br><br>

Email Addres:<br><input type="text"name="contact_mail" maxlength="50"><br><br>

Message:<br>

<textarea name="contact_text" rows="6" cols="30" maxlength="1000"></textarea><br><br>

<input type="submit" value="send">

</form>


Output (Screenshot1)

Creating Simple Contact Form In Php
Screenshot1
This Tutorials Deals With Submitting the contact Form. So, Say for Example You Seen website which have Contact Us Page and You filling You Information and you click to the submit button. You can Retrieve data users Filled Form By storing in database but for now we will sending an email address sending a message to specific email address and that how we are going to be do we will fill the contact form from user and will mail to specific email address.

Code Html Contact Form  

<form action="email.php" method="POST">
Name:<br><input type="text" name="contact_name" maxlength="25"><br><br>
Email Addres:<br><input type="text"name="contact_mail" maxlength="50"><br><br>
Message:<br>
<textarea name="contact_text" rows="6" cols="30" maxlength="1000"></textarea><br><br>
<input type="submit" value="send">
</form>

Firstly we Create a contact Form in html form action is going to be email.php so we are submitting back to same page and this is going to be submitted POST data we are going to submit large amount of data that we don't want to shown in url bar so we use the POST method to send the data from the form. In Form first field i am going to create is name and i am going to break out after this i am going to say input type equal to text because we are taking text value for the name and the name of this is contact_name and then we will break down. Secondly email Address and we going to break and we going to say input type equal to text again name equal to contact_email then break and i am not going to add phone number fields and other its upto you if you want you can add into your contact form. Thirdly message break we going to put textarea so, textarea is just a large textarea to write text. I will give name of contact_text we also give them rows and colons. Breaks down Submit Button as soon as the form is filled and submit button is clicked the email will be send to specific email address. You can also provide designs to the contact form by providing css to html tags. But its simple Contact Form in Php.

Php Script to send the email of the contact Form Filled By Visitors To Specific Email address. When the Form is submitted First Thing we had to do check whether form is submitted and each elements is set. So, we use isset construct and we way isset $_POST because remember we were submitting this variables using POST method variable. So, We pick them up By $_POST and inside square brakcets we need to specify variable to pass in and this is contact_name and then we need to say (&&)and  we apply and operators if contact_name is set and isset in $_POST in square brackets we need to specify next field that we are submitting contact_email and similarly contact_text we will check the value of the html form is set


if (isset($_POST['contact_name']) && isset($_POST['contact_email']) && isset($_POST['contact_text'])) {

Warning: We are Not validating Contact Form the reason for this is its to long Code and unnessary i will be writing another article of email validation
$contact_name = $_POST['contact_name'];
$contact_email = $_POST['contact_email'];
$contact_text = $_POST['contact_text'];


Next thing we had to do is we set them to there variables. So, we can use them lot easier inside if statement. So, I will create Individual variable for each one say $contact_name equal to $_POST['contact_name'];. You were be thinking why we are doing set variables inside if statement outside if statement we get error of undefined index error. Declaration of the variable is always be done after they set. In this way we get out three variable $contact_name , $contact_email and $contact_text. 

if(!empty($contact_name) && !empty($contact_email) && !empty($contact_text)) {

Above Piece of code will check whether form field are empty if they will be empty it will give error message All Fields are required. We go to else part of if statement.


if(strlen($contact_name)>25 || strlen($contact_email)>50 || strlen($contact_text)>1000) {

Above piece of code will check the whether the name is not more then 25 character. email address user is providing must not be more then 50 character. and the text message by user must not be more then 1000 character. otherwise it will not send message and execute else part to the visitors 'sorry, an error occurred. Please try again later.

If This all If statement is Satisfied then email php script will execute. 

$to = 'roxsmohammed@gmail.com';
$subject = 'Contact Form Submitted.';
$body = $contact_name. "\n".$contact_text;
$headers = 'From: '.$contact_email;

if(@mail($to, $subject, $body, $headers)) {
echo 'Thanks for Contacting Us. We\'ll be in touch soon.';
}

Above Piece of code will mail the name, email and message to specific email address here it will email me to my email address roxsmohammed@gmail.com. Read More On Sending email In php. This was the Tutorial for Simple Contact Form and email it to specific email address.
Read More

Wednesday, 9 April 2014

Sending an email in php

sending email in php
To send the email in php using mail function. Its not going to work in out local-server because we don't have an support to done the email on my local server. When you may find an as well you can set this out with we had most paid hosting you will have access to able to send a email by using mail function in php. Let see example to send an basic email.

mail function in php
Screenshot1

Code to sending an email in php


<?php

$to = 'roxsmohammed@gmail.com';

$subject = 'This is an email.';

$body = 'This is a test email\n\nHope You got it.';

$headers = 'From: someone@gmail.com';


if (mail($to, $subject, $body, $headers)) {

echo 'Email has been sent to '.$to;

} else {

echo ' There was an error sending the email.';

}


?>

Output

Firstly we had created php tags now the mail function basically looks like this mail(); and its takes 5 parameters and 1 is optional in total. Now we need to create few variables in order to put inside mail function in php. First one is $to you can take name of the variable any here in this example i am taking $to which will be the email address where we want to send an email to so, in this case i will sent to roxsmohammed@gmail.com. This is my personal bussiness email address. $subject variable is going to be the subject of the email address. this is an email.Now we had variable $body to write an email body. and $headers variable in this example i will only work with basic headers we are just going to use From field we going to say From: someone@gmail.com this is the name which will displayed or an email address from where is email had come. If i am sending mail someone after they register on my website after the register process is compeleted i can sent it from noreply@gmail.com or i can send it from admin@gmail.com. Now to send an email i will use mail function an pass this arguments to actully send the email in php. So, the first one is specify is $to, is recipient's email address then you need to specify $subject of the email. So, our $subject is This is an email then you need to specify the $body so, our $body is equal to this is a test email\n\n Hope you got it. \n will take us to new line . Now we give $headers in $headers there are plenty of information we can pack into $headers but now its simple mail function tutorials i am just giving an idea how it works i am just saying from someone@gmail.com so this is name that will be display when we pickup the email.


Now We will Check whether mail function works so i will enclose mail function into if statement and say if mail then do something here so , i am going to comment inside Email has been sent. then i can say else there was an error sending the email. Just in case mail function failed for one or more reasons we can process there was an error sending the email otherwise email as been send we can say email has been sent to '.$to; This is an sending an email in php.
Read More

Tuesday, 8 April 2014

Creating a Hit Counter In Php

Visitors Counter
Creating a Non Unique Hit Counter. I means By non-unique hit counter i mean that every time the page refreshed or rather every time. We call count function because we dealing lot of function in here. We gonna update a text file with a value and that value is increment on to the value which is previously on the text file. So, We have to create a file we creating with 0 and saving it naming count.txt. It will Increment depending how many times page is refreshed.

hit counter in php
Screenshot1


Code For Creating a Non- Unique Hit Counter

Count.php(Screenshot2)

counter in php
Screenshot2


<?php


function hit_count() {

$filename = 'count.txt';


$handle = fopen($filename, 'r');

$current = fread($handle,filesize($filename));

fclose($handle);


$current_inc = $current + 1;


$handle = fopen($filename,'w');

fwrite($handle, $current_inc);

fclose($handle);


}


?>

index.php (Screenshot3)

index php file
index.php (Screenshot3)

<?php


include 'count.php';


hit_count();


?>

Output

hit counter in php
Screenshot4
count in php
Screenshot5

functions in php
Screenshot6

Include File Inside Php. Always use include files in your website the reason for this copy and paste the code over for every page you want to count on so, better to include file for every time in every page we can use include function.

Creating Count.php Its going to contain the function we need to increment a count So, starting with creating function that's going to be called hit_count() function. So, what we need inside the function first of all we need count.txt so i had created $handle = fopen('$filename','r'); and we are opening to readin so we using r to specify we are reading from this file. $current = fread($handle, filesize($filename)); Line for code use fread function for reading file and Filesize function read file.

Then we are incrementing the file count.txt value with +1 and again saving with increment value to count.txt. So, again with help of file handling writing in php files we can increment value. Every time we refresh page it will increment the value and we will call value by function index.php hit_count() function.

Its every time we refresh the page its increment the value of count.txt by +1 and count the hit counts of the page. This creating a non-Unique Hit Counter.

Creating a File Based Unique Hit Counter


By Unique Hit Counter i mean same as a non-unique hit counter how ever we going to be recording the user ip address and by recording users ip address we gonna lot of mostly accurate figure because ip address always change but we can get lot more accurate figure as the how many unique visitors can take out from our website. From Non-unique hit counter we had file index.php , count.php and count.txt file we also gonna include new file ip.txt we gonna had ip address in here the users had have visited the website that gonna be stored every time they visit. So, the first thing we gonna do is we gonna count a hit that we gonna take out ip address and we are going to store in ip.txt file in line by line bases. 

Code File Based Unique Hit Counter

Count.php


<?php


$ip_address = $_SERVER['REMOTE_ADDR'];


function hit_count() {


ip_file = file('ip.txt');

foreach($ip_file as $ip) {

$ip_single = trim($ip);

if($ip_address==$ip_single){

$found = true;

break;

}else{

$found = false;


 }

if ($found == false) {

$filename = 'count.txt';

$handle = fopen($filename, 'r');

$current = fread($handle,filesize($filename));

fclose($handle);


$current_inc = $current + 1;


$handle = fopen($filename,'w');

fwrite($handle, $current_inc);

fclose($handle);


$handle = fopen('ip.txt', 'a');

fwrite($handle, $ip_address."\n");

fclose($handle);


}


}


?>

index.php (Screenshot3)

functions in php
Screenshot3

<?php


include 'count.php';


hit_count();


?>

Output

In Tutorials Series I had Better way to get visitors Ip address in php as well as before getting visitors ip address we need to check whether it is already there into the file therefore we need file handling functions. File handling checking file exits in php and file handling listing files in php. It allows us to take each ip address in each line and carefully check each one on each line. So, Its very very easy way to doing things. So, First thing we gonna do inside count.php we will make function called function hit_count() and it will be called from index.php (Screenshot3) every time. So, we had a freedom we are including this count by include function include 'count.php' then we had freedom to call function hit_count();. So, we will make now function hit_count inside count.php.

count.php firstly i will get visitors ip address. I am using simple way to grape user ip address $ip_address = $_SERVER['REMOTE_ADDR']; REMOTE_ADDR is predefined variable. So, this is environmental information about the user. Server Variable Remote Address in php and Better way to get visitors ip address in php are post which is very nice to grape visitors please read post and get better understand about how to properly detect users ip address. I am using REMOTE_ADD but i am recommended to you to look up at better way to grape users ip address.

Now Inside hit_count function first we need to Check that ip address is already there in ip.txt file or not the user had been unique visitor or regular visitor.

$ip_file = file('ip.txt')

Make an array of each line of the ip address will  deal as array. Now we using foreach statement to grape each ip address in that so we get each element of the array.

foreach($ip_file as ip);
$ip_single = trim($ip);

We will use $ip_single variable to check whether the  users ip address corresponded to one already here.

if($ip_address==$ip_single){
$found = true;
break;
}else{
$found = false;

}
  }
This is condition to check whether this ip address  is already inside file ip.txt.

If ip address will not found in the file
if ($found == false) {
$filename = 'count.txt';
$handle = fopen($filename, 'r');
$current = fread($handle,filesize($filename));
fclose($handle);

$current_inc = $current + 1;

$handle = fopen($filename,'w');
fwrite($handle, $current_inc);
fclose($handle);

$handle = fopen('ip.txt', 'a');
fwrite($handle, $ip_address."\n");
fclose($handle);

}

}

It will append the ip address of the user. and also increment the count function for count.txt. Its a simple way to create unique hit counter as well as non-unique hit counter.


Read More

Calculate NET SALARY of employees in php


Calculate NET SALARY of employees using following criteria In Php.

If basic salary is greater than 10,000 then

  • Dearness allowance (DA) =5% of basic salary
  • House Rent Allowance (HRA)= 5% of basic salary
  • Provident Fund (Pf) =2% of basic salary
If basic salary is greater than 25,000 then
  • Dearness allowance (DA) = 10%  of basic salary
  • House Rent Allowance (HRA) = 10% of  basic salary
  •  Provident Fund (Pf) = 10% of basic salary
If basic salary is greater than 50,000 the
  • Dearness allowance (DA) = 15%  of basic salary
  • House Rent Allowance (HRA) = 15% of  basic salary
  •  Provident Fund (Pf) = 15% of basic salary

Code For Calculate Net Basic Salary


<html>

 <body>

 <form name="frm1" method="GET" action=""> // Basic Html Form

 BASIC SALARY:<input type="text" name="bs"> // Input Textbox for take value to calculate

 <br>

 <input type="submit" name="submit" value="submit"> // Submit value for calculate

 </form>

 <?php

 $page=$_GET['frm1']; //to get a value from the html form

 if($page="frm1")

 {

 $bsal=$_GET['bs']; // to get value of textbox


if($bsal>=10000) // If basic salary is greater than 10,000 then


{

 $da=0.05*$bsal;

 $hra=0.05*$bsal;

 $pf=0.02*$bsal;

 $ns=$bsal+$da+$hra-$pf;

 echo("net salary is $ns");

 }

 else if ($bsal>=25000) // If basic salary is greater than 25,000 then

 {

 $da=0.1*$bsal;

 $hra=0.1*$bsal;

 $pf=0.1*$bsal;

 $ns=$bsal+$da+$hra-$pf;

 echo("net salary is $ns");

 }

 else if($bsal>=50000) //If basic salary is greater than 50,000 then


{

 $da=0.15*$bsal;

 $hra=0.15*$bsal;

 $pf=0.15*$bsal;

 $ns=$bsal+$da+$hra-$pf;

 echo("net salary is $ns");

 }

 else

 {

 $da=0;

 $hra=0;

 $pf=0;

 $ns=$bsal+$da+$hra-$pf;

 echo("net salary is $ns");

 }


}

 ?>

Read More

About Me

Welcome to Extra Tutorials! My name is Mohammed and I am the 22 year writer, website developer, and photographer behind the blog. Thanks for visiting! Tutorials Jackpot… In addition to Developer, I love to develop websites and I love to write. Starting a php Blog was inevitable for me. What began as a simple way to share all of my Tutorials with friends and family has developed into my Part time job.

Mohammed Padela

WHAT IS PHP PROGRAMMING

WHAT IS PHP PROGRAMMING

Follow Us

Popular Posts

Designed ByBlogger Templates